Wednesday, December 2, 2015

Joy To The World (SSS Create Joy)

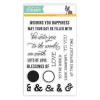
Hey everyone! for today's card I wanted to feature this awesome bold JOY stamp from Simon Says Stamps Create Joy Release.This big JOY stamp is a great focal point on any card!

 I started by taking a piece of water color paper and stamped the big outline JOY in versamark and heat embossed it with fine detail white embossing powder. I took my 4mm molotow and masked off the inside of the letters as to not get any green ink on them.


 To create the background I took some mini distress inks in the colors Evergreen Bough, Pine Needles, Iced Spruce, Weathered Wood and a little Peacock Feathers mixed in there, and smooshed them on my craft mat. I made one layer of color on the paper first then dried it with my heat tool, did another layer with more ink and less water to get a darker look, this creates great dimension with the lights and darks on different layers. I then did the water bleaching technique and splattered some Copic opaque white to get some fun spots/splatters on the card.


After a final drying I removed the masking over the letters so I could paint them in. I took some more distress inks in Picked Raspberry, Festive Berries, Spun Sugar, and Worn lipstick and mixed them into my own pinkish red shade. To add some more interest to the letters I painted them in an ombre starting with the dark at the bottom and going lighter upwards. I dried that with my heat tool and added a layer of clear Wink of Stella (hard to capture in a photo, but it definitely sparkles).

To finish off the card I heat embossed "To the world" on a strip of vellum from the coordinating SSS set Big Add Ons, I rounded the two top corners, added some clear iridescent sequins and some white die cut Lawn Fawn snow flakes.

Happy Holidays!!!!

Also entering this in the SSSflickrchallenge#33 

Supplies:

*Affiliate links used when possible, at no additional charge to you this helps me provide more content/projects for you :) *


Monday, October 26, 2015

Halloween Card +Sharpie background technique

Today I have another Clean and simple Halloween card that has a couple fun techniques and a super easy background.

To start off I took a piece of watercolor card stock and a regular orange colored sharpie, I colored the whole piece with the sharpie making to get a pretty good saturation. Next I took my Ranger alcohol blending solution and made small drops all over the card stock. Since the sharpie is alcohol based it reacts with the solution and moves it around giving this awesome muddled spotty look. I really love how it came out and I'm definitely gonna do it with other colors lol


For my sentiment the word Halloween is a pre-installed word that comes on the 
Scan N Cut 2 but you could use any big bold stamp or diecut letters anything would work. I cut it at 4.5in from watercolor card stock and painted it black, then covered it with a couple coats of black Wink of Stella for subtle shimmer, stamped the happy from the Hampton Art Beware set in versafine and clear embossed it.


To fill in the empty space at the top of the card I freehand drew some simple spider webs and a dangling spider. To give it some dimension I took my glossy accents and put it on the spiders body. I added a few enamel dots, as most of my cards have and there we go a simple (pretty much) one layered card with a fun sharpie technique.

Happy Halloween!!!!