Wednesday, May 2, 2018

Mother's Day card painting with dye inks

Hi all for today's card I was so inspired by the color palette of Gina K's New Autumn Rainbow collection and I wanted to share something fun to do with the water based dye inks. Did you know you can watercolor with them?


I started with the new Center cut star background cling stamp from Simon Says Stamp. I stamped it on watercolor paper and heat embossed it with Ranger liquid platinum embossing powder 


I stamped each color of ink down on my craft mat and put a drop of water on each color. I just mixed it up with a brush and viola you basically have a watercolor. I painted in my whole images and let the piece dry completely before popping it up on a panel of Gina K Slate Cardstock and then on a white card base.

             (It's a little hard to read the sentiment strip in this picture, but you can see it in the first picture)


For my sentiment I used the new Bold Mom die from Simon Says Stamp. I die cut the shadow from neenah card stock and covered it in the same Liquid platinum embossing powder. For the letters I cut them from watercolor card stock and used the Tranquil Teal ink to paint them as well as my thin strip  which was also embossed with the rest of my sentiment. I popped everything up on fun foam and added some clear iridescent sequins!

Saturday, April 28, 2018

You Make My Heart Flutter!

For today's card I'm using the stamp set featured in the April card kit  from the Simon Says Stamp (The kit has since sold out but the stamp set is still available).
I started by creating my background with Watercolor Card stock and Zig Clean Color real Brush markers.I scribbled on the colors, spritzed them with water and mixed/moved them around with a brush. I stamped my butterfly in Versafine Black Onyx ink and clear embossed over it. I used the same colors as my background, painted in my butterfly and then cut it out after it dried.


For the sentiment I did some makeshift stamping arranging to stamp and white heat embossing you make my. I Die cut all my letters from black card stock and glued them down on to a rectangle piece of vellum. I used a T-square and measured to get the words straight and spaced out.


I popped my background up on to a black card base and then attached my vellum piece hiding the glue behind the words and butterfly and finally added some Clear glitter brush pen on my butterfly.


Supplies:

Compensated affiliate links used when possible.

Tuesday, April 10, 2018

Creating an acetate overlay

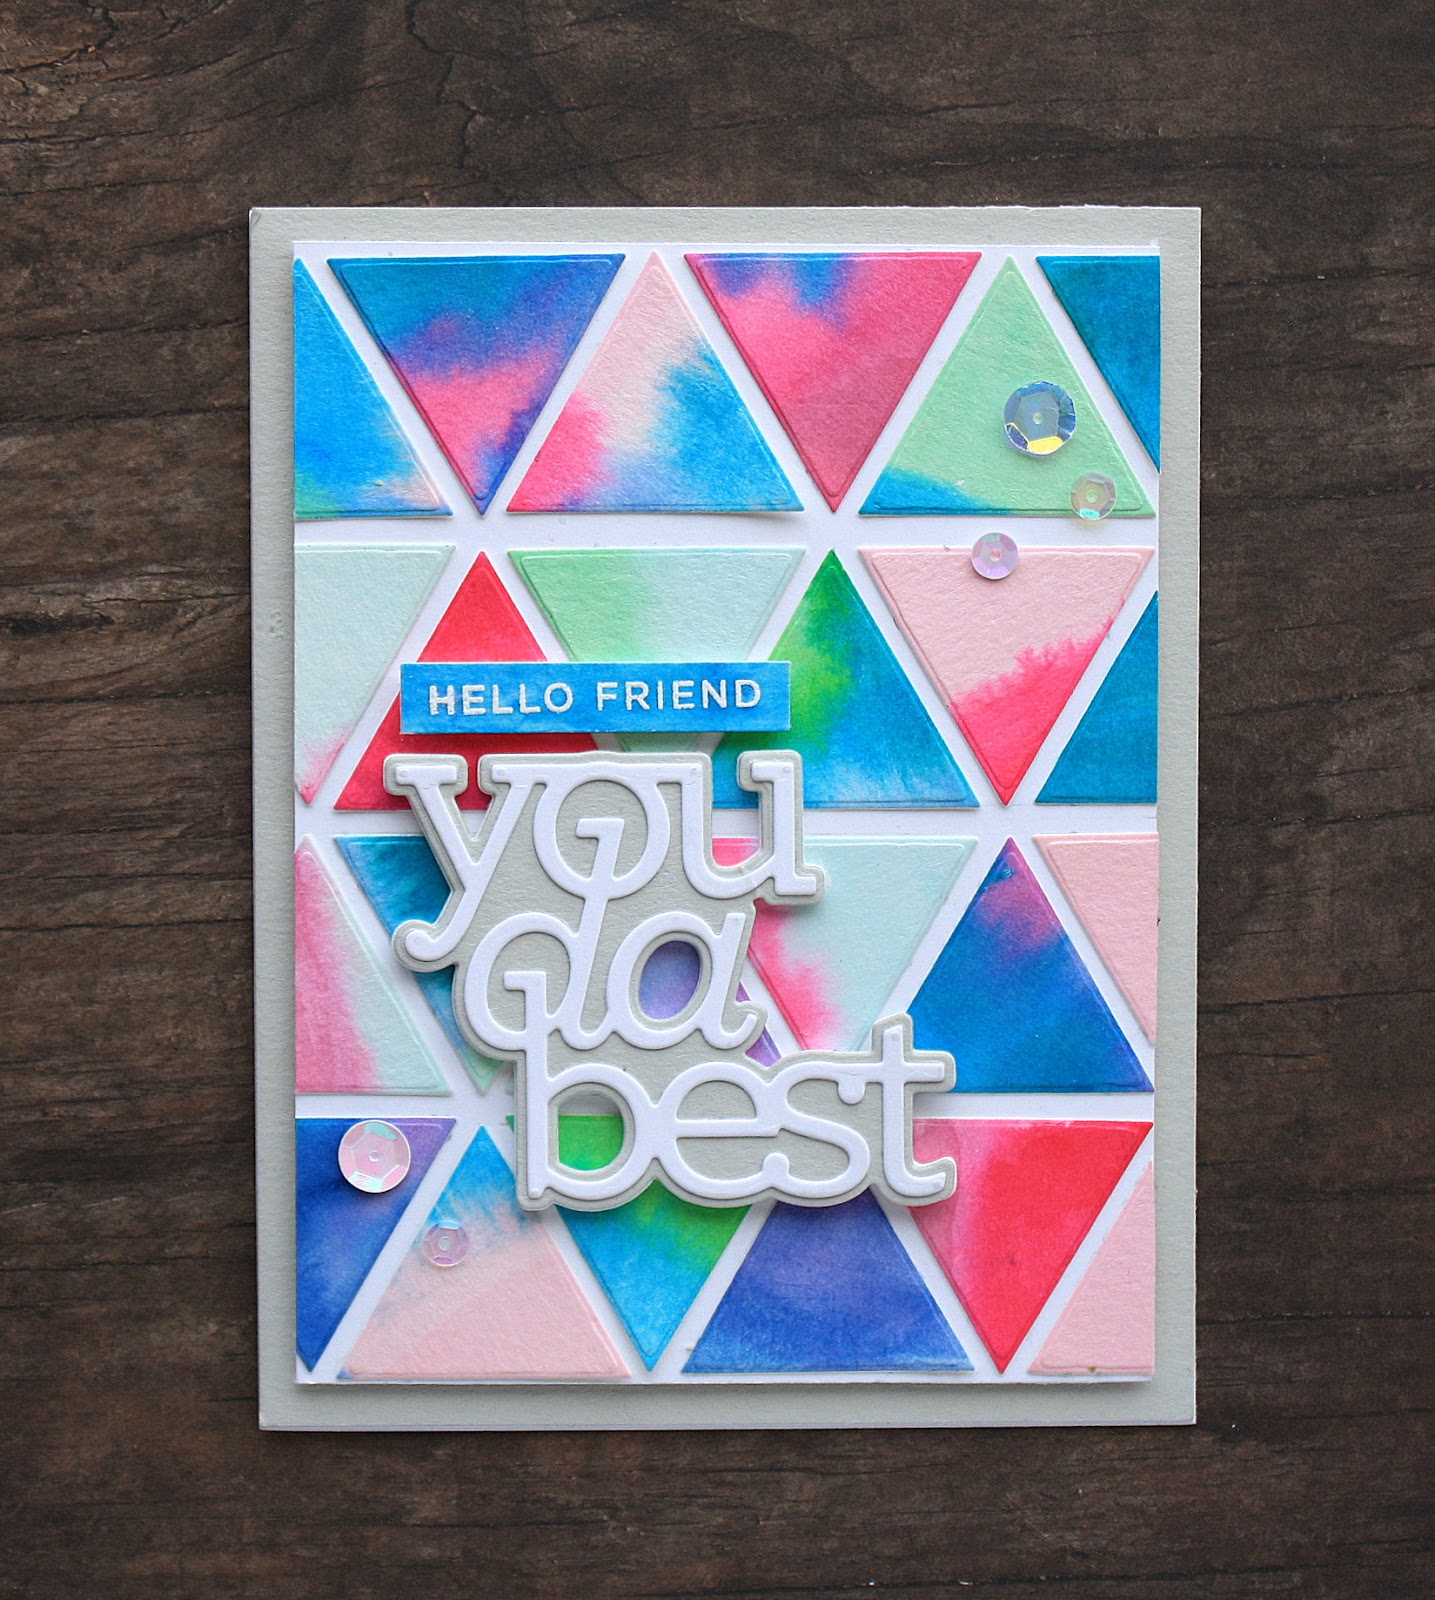
For today's card I'm creating my own acetate overlay with Judikins Embossable window plastic and one of my favorite New Simon Says stamp Cling background stamps. This can easily be done with any stamp be it background or with repeat stamping any image.


To start I took my sheet of acetate, put it in my Misti and heavily applied my anti-static powder bag to avoid any stray white embossing powder. I double stamped with versamark and white heat embossed it (make sure to get your heat gun nice and hot to limit the time on the acetate and avoid warping). For the rainbow background behind the acetate I lightly wet a piece of watercolor paper and colored it with my Jane Davenport watercolor mermaid markers.


Since the background was so bright and impactful I wanted to keep the sentiment and decoration really simple. I white heat embossed and die cut the "Woot" and "It's your Birthday" from CZ designs Birthday Palooza set, one of my all time favorites! popped up the woot and added some black sequins and enamel dots.


Thanks for stopping by, have a great day!!

Friday, April 6, 2018

Triangle Background Card!!

For today's card I wanted to create my own background with the new MFT triangle stax die set and was dying to use the new You Da Best die from CZ Designs..


I started with a piece of watercolor paper and my zig clean clear color brush marker, I scribbled on a little square of each of my desired colors and took my fine mist spray bottle and spritzed the paper. This helped mix and meld the colors creating some beautiful mixes.I then die cut all my triangles out and attached them to another piece of white card stock in a nesting pattern


For my sentiment I used new You da best die from CZ designs and hello friend embossed on a piece painted watercolor paper. I attached both sentiments on fun foam and then on to my card with some fun different sequins to finish off the card.

Thursday, February 15, 2018

Black and Neon card with Gel pen coloring

For today's card I wanted to use this little painting I had made a long time when experimenting with some gel pens. I had drawn a little mountain scene with a Copic multi-liner on some watercolor card stock, colored/painted it in with the Sakura Gellyroll moonlight pens and covered them with spectrum noir clear glitter pen.


To start the card I took my mountain drawing and cut out around the tops leaving the bottom of the  panel to attach to the base which is a piece of 4" x 5.25" black card stock that I splattered with some metallic Gansai tambi paints to create a starry sky effect.


For the sentiment I took a piece of the same black card stock and white heat embossed the 2 lines on the top and bottom. For the "Adventure" I die cut the letter with the My Favorite things Bottle cap letters and colored them with the same gel pens I used on the mountains. I then layered all the pieces of the card popping them up with black fun foam to create some dimension.

**Tip** to get a nice blend with the gel pens color two colors next to each other and with and almost dry paintbrush blend the colors together with a swiping/pouncing motion**